Thursday, September 15, 2011

Tilapia over Pesto Spaghetti


I'm super crazy busy lately which means almost zero time to do my usually planned out grocery shopping! I went to the grocery store today looking for a last minute dinner to put together. The Tilapia was on special and my Mum recently made some dairy-free pesto for Justin and I - giving me the idea to do a pesto and olive oil with the fish. Instead of veggies, I opted for a grain - a thin spaghetti. 
To make this meal, you will need your favorite fish fillet, homemade or purchased pesto (extremely easy!), lemon, and your choice of side.
To make pesto, you will need basil, garlic, olive oil, salt, and a nut (my Mum used pecans for the buttery taste but you can use pretty much any nuts of your choice). Grind together to make a slightly thick paste. You can always reduce the thickness with olive oil, I recommend making a paste and keeping it in the fridge where you will have the option of using it as is or add olive oil.
Cook your Tilapia fillet until cooked through, if I remember correctly it was about 5-7 minutes on medium heat. I'm terrible at flipping my fillets without breaking them - and I hate having to add more olive oil. If you are unsure if your fillets are cooked, just give a peek in the middle. 
At the same time as your fillets are cooking, add your pasta to boiling water. If you are in a hurry, choose a really thin pasta so it doesn't hold up your dinner. Get your pesto ready and toss in with the pasta. Serve with lemon and pesto for the fish. Enjoy!

Sunday, September 4, 2011

Stuffed Portabella Mushrooms


I was seriously craving stuffed mushrooms but I can't exactly stuff them with cheese like usual! I replaced the cheese with a seasoned couscous. Rice is also a good option but couscous is so quick to cook! First I marinated the mushrooms in some balsamic vinegar to give them a bit more flavor. Season the couscous as you like, I recommend garlic and onion, and replacing water with broth instantly gives it more flavor.
Grill or bake your mushroom until tender and stuff with couscous. Add a teaspoon of olive oil for more flavor. I topped it all off with a fresh baby tomatoe from our garden for some sweetness! If you are looking for some protein, I recommend adding a hard-boiled egg - although Justin would suggest bacon! This is just a really simple, vegetarian dinner as well as potentially vegan. :)

This is my dish, but it's a bit fuzzy.


Thursday, September 1, 2011

Pasta and Sausage


I haven't put a new post up in a little bit, mostly because it's almost the end of my classes and I've been busy and also I made this amazing fish dish the other day but it looked horrible! Lol
This dish is so easy and super cheap, and variable! First, pick your favorite pasta (and if you are gluten-free then pick rice flour pasta). Then pick or make your sauce (I used fire roasted tomato and garlic) as well as your meat or sausage. I used a delicious Burgundy Pepper sausage but chicken, seasoned ground beef, shrimp (for pescetarians), pork, or whatever strikes your fancy! I prefer to use uncooked, fresh sausage and I specifically look for ones without nitrates. Uncooked meat does not require to be cooked beforehand so if you are really short on time, get cooked meat or pre-cook when you have time (up to a couple days in advance). While you chop up your veggies, start boiling your water for your pasta. Cook your meat (if you need to) with your vegetables and eventually the sauce when your meat is 2/3rds of the way cooked. When your pasta is cooked al dente, drain and rinse in cold water, and toss with your sauce, meat, and vegetables.
Dinner is ready in less than 30 minutes! Enjoy :)

Sunday, August 28, 2011

Honey Apple Pork


I was looking for an easy meal last Sunday because I was in for a long, rough week! Take a pork tenderloin, mine was about 1 lb, and rub it with the honey apple butter as a marinade. Leave the pork in the refrigerator for at least 30 minutes to 2 hours. Preheat your oven to 375 F, and prepare a roasting pan with a raised rack. Roast for 30-35 minutes to get the pork to medium rare. Don't forget to let your pork rest!
Cook some veggies along side and you have a super easy, delicious dinner!

Sunday, August 21, 2011

Tofu & Egg Pad Thai


Pad Thai is actually an achievable dish, although the authenticity of your dish depends on your ingredients and how it's prepared. The following recipe will get you pretty close to pad thai served at a restaurant, but I will also try to include the authentic ingredients along with the Americanized versions if you wish to pursue a more authentic/traditional version!
Your ingredient list:
Firm or extra firm tofu (1/2 to 1 package depending on liking)
1/2 package of Thai rice noodles (I prefer the widest available but all work)
2 tablespoons tamarind
1 medium-large minced shallot
2 tablespoons sugar (brown or white works)
1 teaspoon chili sauce (Garlic chili or Sriracha works)
2 tablespoons vegetable oil
1-2 eggs
1/2 lime
4 teaspoons fish sauce or oyster sauce
2 tablespoons peanuts
1 cup chives or green onions
1 cup bean sprouts with 1/3 reserved for topping
3 cloves minced garlic

For a more authentic flavor:
Substitute palm sugar for brown or white sugar
Add 1/2 cup banana flower
Substitute Chinese chives for regular chives

Some of these ingredients are not sold in regular supermarkets. You can find tamarind paste at an Indian or Asian market, purchase a paste without pulp so you will not have to use a strainer. Chinese chives are also sold at Asian markets, although you will be able to find regular chives at pretty much any supermarket. Tofu can be found at health food stores or the health section as well as Asian markets. Look for a tofu that specifically says extra firm or a tofu not labeled is usually firm. Firm tofu does not usually have an issue of breaking apart but extra firm is more likely to stay together while taking more of a beating. 

Your first task is to drain your package of tofu and place on a paper towel-lined cutting board. Place a couple paper towels on top of the tofu and weigh down with a slightly heavy object (like a box of cake mix). The pressure just induces the water to leave the tofu which will allow the tofu to brown. Let the tofu sit for 5-10 minutes, replacing towels when necessary. For a final measure, you can take a paper towel and gently press on the tofu (check the sides as well!). Julienne the tofu and cut into 1 inch pieces. In a bowl, add your rice noodles to water as directed by the package. Generally, soak noodles in water for about 10 minutes, or until flexible but not expanded.
Next, heat a large pan or wok with 2 tablespoons of vegetable oil and add your peanuts. If you are allergic to peanuts, you can use sesame oil and skip to the next step. Keep an eye on your peanuts (why I don't suggest you take care of your tofu as well as this step) and make sure they do not burn. Decide whether you will remove your peanuts or keep them in your pan - I don't feel like it really matters so I just keep them. Add more oil to your pan, if needed, and add your shallots, garlic, and tofu. Turn tofu occasionally to brown all sides. 
Once browned, add rice noodles into your pan stirring quickly to prevent sticking. Do not add the water from soaking. Stir your tamarind paste into 1/4 cup of warm water and add with sugar, fish/oyster sauce, and chili. This will brown your noodles, so continue stirring. If there is too much juice, turn up the heat on your pan or wok. Taste your noodles to determine if it needs more salt (oyster/fish sauce), sweet (sugar), or sour (tamarind).
Next, push your noodles to one side of your pan and crack your egg(s) on the bare side. Scramble your eggs until almost cooked and fold into the noodles. Taste your noodles again to ensure that taste is right, and that your noodles are cooked. If they are still undercooked, add a little bit of water until soft (the key is to soak them well in the beginning). Add bean sprouts and chives (and additional peanuts) and cook until noodles are dry and tangled. 
Serve with hot banana flower, lime, peanuts, raw chives, and raw sprouts. 

Enjoy a delicious and flavorful meal!


Saturday, August 20, 2011

Afghan Introduction


I was recently at a friend's house for a study-dinner date. My friends are two Afghan sisters who wanted to introduce Afghan food to me. I absolutely love Indian and Nepalese food so I knew I was probably going to enjoy Afghan food as well! Since its August, the Muslim community is observing Ramadan by fasting while the sun is up. So at about 8 PM, we broke fast with bolani! Bolani is this delicious, buttery (without actual dairy) flatbread stuffed with various vegetables like potatoe and spinach. Although the bolani was most memorable, we also munched on Afghan meatballs, spicy potatoes and garlic, Afghan bread, and shrimp fried rice. My friends wonderfully sent me off with some bolani for Justin - and he was absolutely in love! Since then, Justin's been asking me to figure out how to make bolani but I do not have any tools or ability to make bread (maybe after med school?). Thankfully - I found my way out of having to make bread when I was visiting a local farmer's market this morning! The Afghan booth had four different flavors of bolani and all were vegan! :)

If you are looking to try bolani, check for a local Afghan store or at the farmer's market. If you are looking to make your own bolani, you can purchase phyllo dough (with dairy) or make a dairy-free bread. With a bread maker, add 3 cups prepared bread flour and 1 cup water and follow the instructions from your bread maker. While your bread is preparing, boil water and cook 1 lb of potatoes. Roll a small amount of dough thin (about the thickness of a tortilla) and about 10-12 inches across. Spread about 1/4 cup of potato mixture (as well as any other vegetables you want) and fold in half. Heat oil in a pan over medium heat and brown the bolani on both sides. Serve with plain yogurt or chutney. I heated 1/4 of bolani with a garlic and roasted bell pepper hummus spread for lunch below :)


Pita Bar Night


Justin and I are absolutely in love with pita bread, especially pita chips, so I decided to do a meal incorporating some Greek flavors! This meal was originally just a twist on a normal burger with a turkey patty inside a pita pocket. However, turkey is a naturally very lean meat, so I decided to add some extra flavors with hummus. Hummus is a popular Middle Eastern dip made of chickpeas, which are high in protein. My favorite flavors are roasted garlic, red pepper, or a mix of the two. This led to my other toppings: cucumbers and light feta cheese. You can also add tomatoes, lettuce, or even a tossed greek salad. I prefer to stay away from the extra carbs, but seasoned rice is an option as well.
Instead of making turkey patties, I ground up the turkey with sea salt and Greek seasoning (well worth $5 for the flavor it brings). Ground turkey, instead of formed patties, makes you consider portions a bit more (IMO), so I chose to do that instead.
Set out all your toppings, make your pita pockets, and create your pita bar!

Wednesday, August 17, 2011

Sausage and Italian Barley Salad


While visiting my parents, my Mum awakened Justin's passion for barley. Since then, he'd been asking for me to make barley salad, so I finally did! Barley is a great source of fiber and a little protein. To cook barley, cook one cup of barley in 2 1/2 cups of water for 35-40 minutes.
Once the barley is fully cooked, toss with olive oil and red wine vinegar (to taste). Add salt, freshly chopped garlic, and basil. Throw in some tomatoes, I prefer the baby heirloom tomatoes because they add a sweetness. :)
I paired the barley with a mild Italian sausage so the acidity of the barley will be cut by the richness of the sausage. Any marinated meat would work as well! :)
Just an easy dinner tonight!

Sunday, August 14, 2011

Jazzed Up Steaks


I was trying to come up with what I wanted to eat this week - and read Justin's mind about what he felt like eating. I don't know about you all, but trying to get Justin to cough up what he feels like eating is harder than getting him to close cabinet doors after himself. His reply is always "I don't know. Whatever sounds good." and then I end up having to come up with a couple options and if I'm lucky he'll be pretty decisive on just one!
So naturally, being out of food and since it's the weekend - it was time to do our little ritual of picking out this week's meals. It's been a little while so I decided to treat Justin to some red meat! I found this recipe for steak that has a summery touch and as Justin likes to refer to "fancy". This is a steak over bruschetta with a tossed spinach salad in vinaigrette and crostini.

Your first priority is to find your steak! They had a pretty good quality steak on special at a local market so I got about 1 lb of steak which makes enough for 3 slightly large servings. Remember that your steak is the star of your dish so if you can, throw in a bit of extra money for a really good quality steak! The original dish called for pesto but since I was unable to find a dairy-free pesto (and I decided I was gonna be too lazy to make one - too many other things competing for my attention this weekend!) so I just replaced it with bruschetta. And since Justin is in love with bruschetta, it was a win-win situation. :)   Also pick up your favorite green for a tossed salad, I picked spinach because it has a great source of iron but others work just as well like arugula.
Here is a total list of your ingredients:
Steak
Bruschetta
Greens (Spinach)
Your favorite bread (Ciabatta)

This meal is super fast and easy - but you need to have everything going all at once! First, slice your bread into about 1/2" slices and place them on a baking pan. Spread a small amount of olive oil on each bread and sprinkle a small amount of salt. These go into the oven at 350 degrees F for about 5-6 minutes to get the bread just crusty. After putting your bread in the oven, put your pan on the stove to heat. Once it is warmed up, place your seasoned steaks in the pan, I seasoned my steaks with a sprinkle of sea salt and minced rosemary. I don't really cook my steaks via time, so if this helps, flip your steaks once they are cooked almost halfway through the steak. Cook the steaks on the opposite side for about 1 minute less than the other side, turn off the heat, and leave the steaks to finish cooking. After flipping your steaks, take your greens and toss a mix of 2/3 olive oil and 1/3 balsamic or red wine vinegar with a sprinkle of sea salt. If you are nervous about the simple flavors of a vinaigrette, any flavored vinaigrette can be substituted.

Once you have all your components prepared, smear about 2 tablespoons of bruschetta/pesto on your plates, top with your rested steaks, and a nice bunch of greens with a crostini. Enjoy!

Friday, August 12, 2011

Thai Green Curry


Thai Green Curry is one of my favorite Thai dishes, besides yellow curry, because its sweet and spicy with a wonderful blend of kefir, lemongrass, and thai pepper flavors. It's actually pretty simple to make a good thai curry - although your flavors won't be truly authentic, you will make a very delicious meal!
You will need:
Chicken or tofu
Green curry paste (you can also use yellow quite similarly but the recipe for red curry is a bit different)
Coconut milk
Ginger or galangal
Kefir leaves (from a Kefir Lime tree) - this is optional but it gives a great flavor
Garlic
Vegetables: I always use onion but carrot, potatoes, spinach, and peas are great additions to Thai alternatives. For a traditional green curry, there's usually Thai eggplant which is slightly larger than a pea but pretty similar.
Oil of your choice

I warmed up my largest pan with a good amount of oil to sautee two large chicken breast. I used flaxseed oil instead of my usual vegetable oil, as I try to include it in my cooking about once a week. If you didn't know, flaxseed oil is a great source of omega-3 and fiber which is suspected to help with inflammation, diabetes, and cardiovascular disease.
Cook your chicken about halfway and then add your garlic, ginger, and vegetables, unless you are cooking potatoes and large chunks of carrots. Continue cooking until about 3/4 of the way done, then add green curry paste and coconut milk to taste (you want to create a nice thick sauce for your meat and vegetables). Let simmer until your chicken is fully cooked. If you have kefir leaves, add them to your curry while you are simmering.
Serve over rice and enjoy!

Coming up next week: an Italian barley salad :)

Thursday, August 11, 2011

Pizza Night


If you are like me, you are also disappointed with frozen pizzas. The crust tastes like cardboard, it doesn't have enough cheese or it has too much cheese, or there isn't a pizza with just your favorite toppings. However - frozen pizza is a convenience. But if you have an hour of time one night, you can make your own pizza exactly the way you want! :)
Since my s/o has a milk allergy, his pizza must be dairy-free. Obviously this means no cheese, but if you get enough toppings you won't even miss the usually essential part of a pizza. For the dairy-free pizza, Justin usually has a ton of pizza sauce, then a layer of veggies, topped with at least two sausages and 1/3 lb of pepperoni. I'll give you some tips about making homemade pizzas, especially when it comes to the dairy-free variety!
What you will need first, is to find fresh dough. You can find these at higher-end supermarkets but double-check that it is dairy-free! I prefer the whole wheat dough for fiber. :) One way to really flavor up your dough, especially if you don't care for the taste of whole wheat, finely mince garlic and herbs (like rosemary) and knead it into your dough to mask the taste. Let your dough rest for about 20-30 minutes while you prepare your toppings. For the dairy-free pizza, sausage is a great alternative to cheese (or so Justin tells me). To ensure that your pizza isn't drowning with fat from the meat, remove sausage from the casing and drain the fat after cooking.
I take my risen dough and split it in two to make two personal pizzas. Use a rolling pin, or your hands to stretch out your dough. Top off your pizzas and place in a greased pan at 425 or 450 degrees F. To brown your crust, brush olive oil over the pizza crust. For a thin-crust pizza, cook for 12-15 minutes but for a thick-crust pizza, cook for 15-18 minutes.

For a cheese pizza, here are some combinations you should definitely try!
Low Calorie:
Skim mozzarella with low fat feta cheese for a tangy combination
Skim mozzarella with fresh sliced tomatoes and basil for a traditional pizza
Not Counting Calories:
Mozzarella with regular feta cheese
Mozzarella with goat cheese

These are some of my favorite combinations! By choosing skim or low fat cheeses you can create a tasty combination without piling on the calories :)

Wednesday, August 10, 2011

Summer Pasta with Sausage


This is a late post since I've been feeling kinda sick - but thankfully when I'm feeling ill, I love to munch on a light pasta. Talking to my friends, I feel like there is often a misconception about pasta. There is pasta topped with marinara, bolognese, or alfredo and then there is pasta tossed with butter. I get bored with these limited options - especially since alfredo and butter are not possibilities!
This pasta is a refreshing option that lets fresh ingredients like basil and lemon shine.
Take your favorite pasta, I used linguine as a medium between my favorite (spaghettini) and Justin's (any thick pasta). Cook the pasta al dente while you cook your sausage in garlic and shallots. I prefer to remove the sausage from the casing and my favorite is sweet italian because it melts in your mouth like butter. When the sausage is 3/4 of the way cooked, add spinach to your pan to cook. When the pasta is finished, drain and toss with olive oil and a light amount of balsamic vinegar. Toss in your sausage and spinach mixture, add lemon zest, and fresh squeezed lemon juice to taste. Add basil for a refreshing, light summer pasta!

Tonights dinner is homemade pizzas! It seems I've been craving Italian as the past couple meals have been following the theme :)
I'm also looking for a Moroccan or Indian dish thats milk free if anyone has suggestions?

Sunday, August 7, 2011

Parents Weekend!


Justin and I headed back home to see our parents this weekend - which means some amazing home cooked food :)
It's kinda nice to not have to worry about planning and cooking sometimes - although I think I have it pretty easy most of the time since Justin helps me out in the kitchen whenever he can! :) And sometimes he will even make dinner for us when I'm out of commission! :)

My Mum made this wonderful dinner, a dairy-free calzone with homemade marinara sauce and an arugula salad. First, my Mum made the dough and let it rest in the oven to raise. You can use any dough recipe you like, and if you don't have the time (like me!) you can pick up pre-made dough in the fresh or frozen aisle at pretty much any nicer grocery market (Trader Joe's, Whole Foods, ect). Check the ingredients in the dough, but all of the stores I've been to have been dairy-free. Next, my Mum cooked mushrooms, bell pepper, and crushed red pepper and put it aside. She then cooked uncased sausage until 3/4 brown and then re-added the vegetables. She then added the mixture to the risen dough and folded the dough to cover the mixture. Stick the calzones back into the oven until golden brown and serve with your favorite marinara or bolognese sauce! The secret to a really great complementing sauce to your calzone is a bold red wine! You can also play on garlic, basil, or your favorite herb :)

Hope you all had a great weekend and enjoy this traditional dairy meal that you can now make dairy-free! This dish also can be made without meat for any vegans out there :)

Wednesday, August 3, 2011

Chicken Tortilla Soup


This is one of my favorite meals when I do not have time to stand over a stove and cook! I make my tortilla soup in a slow cooker so if I have an hour in the morning or the afternoon - and no time at night, I can still have a nice dinner ready whenever I want or need! The beauty of this soup, in my opinion, is that you can literally put whatever vegetables you want in it. I kept it pretty traditional when I made my tortilla soup but I had a leftover carrot so I threw that in as well. 
You will need no longer then one hour of prep (I've got a troublesome can opener!) and 3-4 hours on HIGH or 6-7 hours on LOW to cook. I really don't think there's a difference in taste - I feel its more up to when you have time (morning or afternoon).
My recommendation is to chop up all your veggies first:
1 small onion
1 carrot (tossed in a leftover veggie)
1-2 jalapenos (depends on how spicy you'd like it)
1 bag frozen corn (I didn't have enough time to prep fresh corn)
1 can whole tomatoes OR diced tomatoes 
1 large can of tomato paste (not many recipes include tomato paste but I use it to thicken the soup naturally)
1 can black beans (any beans will do and it will add more protein!)
Cilantro

Drain your beans but add the liquid from the can whole/diced tomatoes. Add about 10-12 oz of enchilada sauce (I found an awesome dairy free version at Trader Joes as they usually have some form of milk. At this point you should have a ton of awesome, colorful veggies in your slow cooker with some liquids. Add your chicken (strips, cubes, whatever you desire) to your slow cooker and then add enough chicken broth to cover everything and set to cook!
When your meal is ready, top with crushed tortilla chips, cilantro, and sour cream/cheese! :)

For an easy access list, the following are ingredients needed to make this delicious soup:
1 bag or 1 husk of corn
1 can whole or diced tomatoes + sauce
1 large can tomato paste
1 small onion
1-2 jalapenos
1 can black beans drained
10-12 oz enchilada sauce
Around 4 1/2 cups or 36 fl oz of chicken broth
1 1/2 lbs of chicken breast
Cilantro
ENJOY! :)

Monday, August 1, 2011

Meatloaf

No picture of the meatloaf tonight! If you have a crazy day where you need to cook, eat, and clean up after yourself (with a little time to spare to change!) in 40 minutes - this is the meal for you! I never actually had meatloaf growing up but Justin is from a midwest All-American family and its comfort food for him :)
This is actually his mom's recipe - although I've never measured anything for this recipe (makes things quicker - in my opinion!). For Justin and I, I pick up 1 lb of ground beef with the lowest fat content I can find (if you pick up a fattier piece of beef, you can cut down on the wet ingredients) which makes 1 dinner and a lunch for one person, although Justin is a big eater! Take your pound of beef with chopped onion and 1 cup of oatmeal per pound of beef in a mixing bowl. For 3-5% fat content, add about 2-3 tablespoons of ketchup and 2-3 tablespoons of Worcestershire sauce. Mix your beef until ingredients are evenly dispersed and spread onto a baking pan (or even a baking sheet). I personally use a square glass baking pan - but that's like my one square pan lol.
Cook 1 lb of beef at 400 degrees for 20 minutes. You can also cook at a lower degree for a longer period of time - which would allow a slow roasting of the flavors - but I just did not have time tonight! The great thing about meatloaf is you have the option!
Within 40 minutes (10 to prep, 20 to cook, 10 to eat), you will be fed a great hearty meal!

Sunday, July 31, 2011

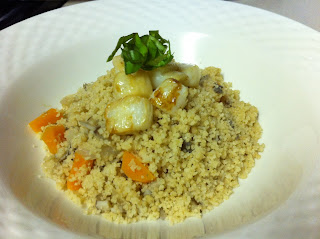
Bay Scallops and Couscous


I was going through the ads at the local supermarket stores and Bay Scallops were on sale for super cheap!! I have been dying to make scallops for Justin since his only experience with scallops can be summed up as "rubbery, grimy, sandy". I really wanted to change his mind on scallops because I am in LOVE with scallops. They have such a delicious texture and taste - and they really only need a couple fresh ingredients to allow the scallops to shine! 
My total list of ingredients: mushrooms, carrots, bay scallops, shallots, garlic, couscous, broth, basil.

PREP: Preparing your scallops correctly is THE most important thing!
After purchasing fresh scallops, it is recommended that you cook them that day. You can however, keep them in the fridge up to 3 days. Your first step in prepping should be to rinse your scallops and pick through them (just to make sure they all look good, they should be clear white). Put your scallops on a paper towel and pat dry lightly. With a pairing knife or your nail, peel the muscle band off your scallops. This band will be an irregular square on the side of your scallop. Not all scallops have these muscle bands, but many do and keeping the band is often the reason for the taste that turns people off (or so I've heard). The muscle will be very easy to remove - just make sure you have a knife handy if you start pulling on the flesh of the scallop!

If you are wondering, here is a little biology into your food! Scallops are classified as bivalves because of their digestive properties. They grow in a shell to protect from predators, and the rings on the shells tell the age of the scallop (much like tree rings). Scallops are attached to the shell by a muscle, which is often kept with the scallop when they are shucked.

Make sure your scallops are patted dry well after removing the muscle band. Season with salt - and you are ready to cook! Because these scallops are little and were stored in water, I did not add flour to aid in the drying process. Sea scallops are often rolled in flour to soak excess water but bay scallops stored in water will often release water when they are cooking, causing the flour to wet as well!

COOKING: I started the couscous first because it needed a longer time to cook then the small bay scallops. Take a pot and drizzle about 1 tablespoon of olive oil over medium heat. Add the garlic and shallots and cook until translucent. Then add the carrots and mushrooms and cook, covered, for about 3 minutes. After the carrots are done, add 1 cup of couscous for every 1 1/4 cups of broth (1 cup is plenty for two people!).
While the couscous is cooking, put 2 tablespoons of olive oil, heat the pan to atleast medium heat. Put the bay scallops in and cook for about 30 seconds - 1 minute (depending on size) then flip ONLY once!
Serve together and top with sweet basil to emphasize the sweetness in the bay scallops :)

BTW - this made Justin into a scallop lover! If you follow the prep, you can turn anyone into a scallop lover after this meal! :)

Saturday, July 30, 2011

Angel Food Cake and Cranberry Compote


I was feeling like having a dessert after the Orange Chicken, so I sent Justin to the store to find an angel food cake and I would make a cranberry and orange compote with leftover frozen cranberries (see the Cranberry Orange Muffins). Unfortunately, the store didn't have any angel food cake left, so we picked up a box mix. I don't usually do box mixes, unless I'm short on time - or if it is for a friend and they don't have dietary restrictions so the milk will already be included. Tonight I was low on time and didn't really feel like experimenting! All and all - the box mix actually turned out pretty good and the oven caramelized the tops! :)
For the compote:
1/2 bag of cranberries (probably around 1 1/2 cups)
1 cup of sugar
1 cup of water
Freshly squeezed orange juice, or orange zest (based on preference)

First make a syrup with the water and the sugar over heat. Add the cranberries and bring the syrup to a low rolling boil for at least 10 minutes. During the 10 minutes, the cranberries will slowly crack open and thicken the sauce naturally.

Orange Chicken


I had originally planned on making Orange Beef, but unfortunately with my final for school and everything I forgot to check on my meat and it expired! :( Thankfully I stock up on chicken breast from Costco so I was able to just use similar ingredients to make Orange Chicken. Since the chicken is a leaner meat, I dipped the chicken in freshly squeezed orange juice and then rolled it generously in whole wheat flour. I did not season my flour because I was making a glaze that had soy sauce which is plenty salty already.
In my large nonstick pan, I added about 4 tablespoons of vegetable oil and pan-fried my floured chicken. I let the chicken brown on one side and then flipped once and let the chicken finish. While the chicken was cooking, I started on the glaze. My original recipe for the Orange Beef had me cook my vegetables in the sauce (bell pepper, onion, ginger, and a home grown spicy pepper) so I did the same for the chicken. I added the vegetables to:
1 1/2 cups water
Freshly squeezed orange juice (to taste)
1/3 cup rice vinegar
2 1/2 tablespoons soy sauce
Grated orange zest
1/2 cup sugar (recommended brown but I only had white, also the recipe called for 1 cup of sugar which I thought was majorly excessive and 1/2 cup turned out perfect! But I suggest adding in increments and tasting!)
Green onion to taste

After the vegetables finished cooking, I removed them from the sauce and added them to the pan with chicken, letting the sauce simmer. The sauce is still very much a liquid at this point so I added 1 tablespoon of cornstarch (with cold water) and after a minute, removed the now glaze. 
Side Note: When working with cornstarch, add 1 tablespoon of cornstarch to 2 cups of liquid. However, be careful not to overstir, stir vigorously, or overheat the  liquid (anything above medium heat for a prolonged period of time after adding the cornstarch). 
Add the glaze to the chicken/vegetables and serve immediately over a bed of rice!

Wednesday, July 27, 2011

Taco Night


This is one of my favorite meals to make because its a life-saver when I'm beyond busy (finals week!) and tacos are comfort food for my s/o and I :) I love throwing some extra veggies in, making my own guacamole, and occasionally making my own salsa! I cooked ground turkey in my own mix of taco seasoning (pre-packaged seasonings often contain milk derivatives) - although seasoning the meat with thick salsa is also a great option! :) 
For the guacamole, I added minced onion and garlic, cilantro, salsa, jalapenos, and salt - these are my staples when I'm making guacamole but I love that it's adjustable based on how I'm feeling :)
Nothing fancy tonight - just some good comfort food! :)

Saturday, July 23, 2011

Italian Sausage and Orecchiette


I'm quite careful with sausages because I'm sensitive to the preservatives but I found these nice hot Italian sausages from a local Trader Joe's! I made this great easy meal with a very minimal amount of ingredients!
1/3 cup Olive Oil
Italian sausage (hot or sweet)
Spinach or Broccoli Rabe
Orecchiette
4 cloves Garlic
Red Pepper Flakes

As a recipe suggested, I boiled a pot of water and cooked the spinach first, which I removed into a separate bowl. I then cooked the pasta in the water. While the pasta was cooking, I removed the sausage from the casing and let my pan and 1/3 cup of oil, garlic, and red pepper flakes heat. I added the sausage, until brown, then added the spinach to cook. This meal takes less than thirty minutes to prepare! I also added a bit of crushed homemade croutons, leftover from last week's soup, to create a bit of a different texture. And of course - cheese! I used a skim mozzarella but parmesan-reggiano would add a wonderful nutty flavor as well!

I found the original recipe in a Williams-Sonoma International Cookbook at Borders' going out of business sale! My passion is international food and I cannot wait to cook more of these recipes! I especially have my eye on curried cauliflower from India! :D

Friday, July 22, 2011

Thai Peanut Satay


This is one of my favorite "30 minutes or less" weekday meals! Finals for summer session classes are coming up and after taking a long study break this morning I needed something super quick and easy! The only basics you need are:
Your favorite Peanut Satay Sauce
Onion
Meat (I always use chicken)

Mince half of a yellow onion (I like it to be about the same size as the rice grains) and add to a heated pan. Saute the onion until partially translucent, then add your meat (I recommend bite-size pieces so it cooks quicker!). Once the meat is halfway done, add a generous amount of satay sauce. Store bought sauces are incredibly variable in the thickness of the sauce and the  taste. I recommend House of Tsang for a sweeter, more mild taste or San-J Thai Peanut Sauce for a spicier, bolder flavor. I cook my peanut satay off the skewer just because my s/o doesn't care for the taste of baked chicken.
If you have the time when cooking this meal, get creative with different vegetables and presentation (use skewers and grill or bake!). I've been dying to try the peanut satay with thai eggplant and some other fresh vegetables! :)

Tuesday, July 19, 2011

Spicy BLT Soup


As I'm posting, I'm currently eating the soup and it is so good!
I took 2 lbs of tomatoes and roughly chopped them, sprinkled with sea salt and left for about 10 minutes. While I was waiting for the tomatoes, I chopped 1/2 of a large cucumber, 1/2 of a small yellow onion, and 1 Thai Dragon Pepper (from our garden!). In a food processor (the recipe recommends a blender but I am without!), I combined the tomatoes, cucumber, onion, and pepper with:
1/2 teaspoon sugar
1 slice bread without crust
1/2 cup extra virgin olive oil
1 smashed garlic clove
2 teaspoons of white-wine vinegar
Blend ingredients until smooth. Pour the soup through a fine sieve, discard solids. Cover soup and refrigerate until cold, up to 3 days. 

I topped the soup with crispy bacon, drizzled a bit of vinaigrette, and basil. I know its BLT, and I'm missing the lettuce but I didn't feel it was worth purchasing a head of lettuce for a couple bowls of soup!
This soup really allows the taste of the fresh vegetables (and fruits - tomatoes) to shine! What a great meal on a hot day :)

Monday, July 18, 2011

Leftovers!

Being both college students (my s/o and I), we unfortunately don't have the time or the fridge space to cook a new meal every night! Some nights, I plan to have leftovers and Justin decides he's super hungry and eats it all! Lol :)
Even though it is summer, Justin is working full-time and I'm taking summer classes (which is about 13 hours of classes/lab a week - pretty much a full schedule).
The stuffed shells made two dinners of leftovers, which worked out pretty well since Monday's are always rough with Justin working a full day, I have class and a late night internship.
Tomorrow, I'm super excited to prepare the Spicy BLT Soup :)

Saturday, July 16, 2011

Stuffed Pasta Shells


Almost a year ago I started cooking dairy-free. After a couple months without pasta, I got a huge hankering for some ricotta stuffed pasta shells. Of course, I'd have to eat them by myself and I almost never cook just for myself - so instead of cheese - I stuffed the pasta shells with meat! I cooked ground turkey (beef works well also!) with my usual recipe that I use for meatballs:
Ketchup
Italian Spices
Garlic
Finely chopped onion
Red Crushed Pepper
Salt/Pepper
I cooked the meat about 3/4 of the way through while my shells soaked in some cold water. I took the meat of the stove and spooned a good tablespoon and a half into each shell. After all the shells were stuffed, I topped it off with pasta sauce - and putting my shells in a separate dish I added some light mozzarella cheese! The shells, sauce, and meat cooked for about another five minutes and then ready to eat!
This meal is great if you have some extra time on your hands one day but absolutely no time the next! I took about an hour and a half to prepare - with the TV on (lol) - but I have quite a few meals of leftovers!

Super excited about another meal this week - BLT soup! And it requires almost no cooking!

And sorry about the messy photo!

Cranberry Orange Muffins


Baking without any diary is quite challenging but not impossible! These muffins are a great snack or breakfast and modifications allow you to make them as healthy as you wish (or not!). 
Although I often don't measure so these are approximations, here's the recipe I followed:
2 cups flour (I used whole wheat flour)
1.5 teaspoon baking powder
1/4 teaspoon salt
1 Tablespoon orange zest
1 teaspoon vanilla extract
2 eggs
2/3 cup sugar
2 Tablespoons oil (I used flaxseed)

The below ingredients I adapted to make the recipe dairy free:
 1/2 cup unsalted butter  ------------------------>    1/2 cup orange juice (freshly squeezed) with 1/4 cup applesauce
  1/2 cup milk                ------------------------>     1/2 cup soymilk 

Directions:
1) Preheat oven to 375 degrees F
2) In a large bowl add the flour, baking powder, and salt. Set aside.
3) Originally the recipe called for the butter and sugar to be creamed together with the orange zest. I, however, added the sugar into the orange juice and applesauce until well blended.
4) Add in the eggs, vanilla, and oil. Blend well.
5) Add the flour mixture, then some soymilk (or milk) alternating until complete.
6) Bake the muffins for 20 minutes.

Enjoy! These were delicious :)

Honey Apple Pork Chops


I made this meal last week but with classes did not find the time to post until now! Pork chops were on special at a local market and I picked up "Honey Apple Butter" from a local Trader Joes. This sauce is amazing on pretty much everything and worked very well as a marinade for the pork. Placed on a bed of green beans and applesauce on the side, this meal was hearty and filling and ready in less than 30 minutes!

Monday, July 11, 2011

Thai Spiced Tofu


Tonights dinner was Thai Spiced Tofu, with a side of curried green beans and crusty bread. The picture, honestly, does not do the food justice! But lighting was off tonight and I was hungry! I left the tofu as a whole for about five to ten minutes to loose some of the water before slicing into about 1/4" thick slices and in half (to make my man feel like he's getting more food lol!). I personally feel like its easier to cut when some of the water is drained but purchasing extra firm tofu also helps to keep it together!
I cooked the about 2/3 lb of green beans in 1/3 cup of broth, 1 Tbsp sesame oil, and a small teaspoon of green curry. The original recipe called for thai red curry but we prefer green or yellow. The green beans cooked on medium heat for about 6-7 minutes, and then were set aside. 
The tofu was dipped in a marinade of: 
1.5 tsp green curry 
1.5 Tbsp oyster or fish sauce
 2.5 Tbsp of sugar
 And a little water to make the sauce less thick
 Quickly cover the tofu, and put in a pan of a small amount of sesame oil. Let the tofu cook for about 3 minutes on each side or until a nice golden brown.
And a slice of crusty bread as a side to a sweet and spicy meal!

Asian Marinated Ahi Tuna

I made this for my s/o last night because it was the first meal his parents made for us and lean and hearty at the same time! :)
The Ahi Tuna was purchased at Trader Joe's for a pretty reasonable price and marinated in:
2 Tbsp Soy Sauce
2 Tbsp Sesame Oil
4 Slices of Fresh Ginger (1 cm thick)
A couple pieces of Lime Zest
Left the fish in the marinade in the fridge with three hours. I took the fish out for about 10 minutes to get it to room temperature. I cooked the fish in a minimal amount of sesame oil for about 1.5 minutes on each side. Layered on a 1/2 cup of brown rice and skinny asparagus with a little olive oil, sea salt, and pepper!
A great, light meal before taking a friend's dog out for a long walk :)

By the way - I could use some suggestions for meals! It takes me twice as long to come up with a meal plan for the week then it usually does in fall/winter/spring! I'm secretly wishing for it to be September soon so I can pull out my soups, stews, roasts, and curries!